|
Up to this point, the rotations have been centered at the origin.
So, how do you deal with rotations that are not centered at the origin?
The basic answer is that you can use right triangles to rotate the points (Method 1),
or you can
"duplicate" the origin to coincide with the new center point and
proceed from that point (Method 2), or you can "count" the distances (Method 3).
While all three methods apply the same premise, each method is applied in a slightly different manner when working on a problem on paper. Method 3 is the least "messy".
| Rotating the point P(4,5) 90º CCW About the Center Point C(2,1): |
Method 1 - Short and Sweet Rotating a Right Triangle
• Plot the point P and the center C.
• Draw a segment to connect
point P to point C.
• Draw a right triangle using the connecting
segment as the hypotenuse.
• Rotate the right triangle 90º CCW.
Imagine putting your finger on point C
to hold the triangle steady as it is rotated.
• The vertex joining the short leg to the hypotenuse in the
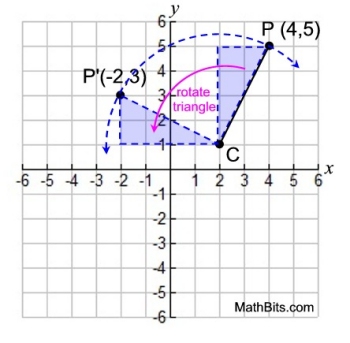
right triangle will be the image of point P, which is P'(2,3). |
|
Notice how the hypotenuses, which are of equal lengths in the two congruent triangles, represent radii of the circular arc through the point and its rotation.
In a rotation, the point and its rotation are the same distance from the center of rotation. |
| Rotate ΔPQR 90º CCW About the Center Point C(2,1): |
• The process used above to rotate point P will be duplicated for points Q and R.
• Connect C to the vertex.
• Draw a right Δ
with that
segment as the hypotenuse.
• Rotate Δ
about point C.
• Just remember to rotate about point C. Think of a vertical line through C and hold your finger on C to secure that vertex of the Δ. |
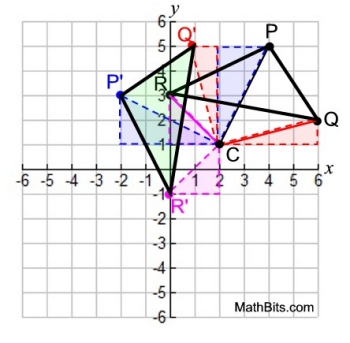
The triangle shaded in green is ΔP'Q'R'. |
While Method 1 is quite easy to follow when dealing with one point, it can get rather messy when drawing triangles for multiple vertices of a geometric figure (as seen in the example above).

 |
 |
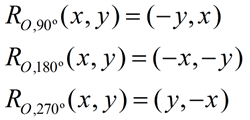
For Method 2, we will still be using the basic mapping rules through the origin for rotations of 90º, 180º, and 270º CCW. |
| Rotating the point P(4,5) 90º CCW About the Center Point C(2,1): |
Method 2 - Duplicate the Origin at the new Center
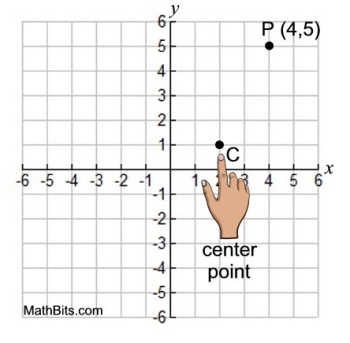
• Plot the point P and the center C.
• Since our basic mapping rules only apply in reference to the origin, we need to make some adjustments.
• We are going to make point C
the temporary "origin",
(move the origin to point C)
|
 |
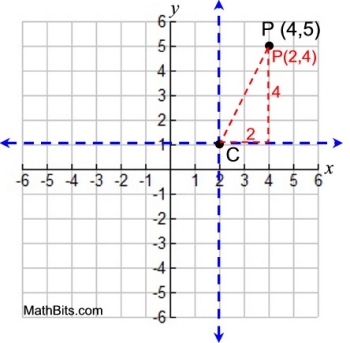
• Temporarily make point C the origin.
• Draw a vertical axis and a horizontal axis through point C.
• Now, in this "new world" we created around center point C (as the origin), we will need to re-label point P.
• In relation to center C, point P is 2 units to the right and 4 units up. Treating point C as our new origin, point P becomes P(2,4). |
 |
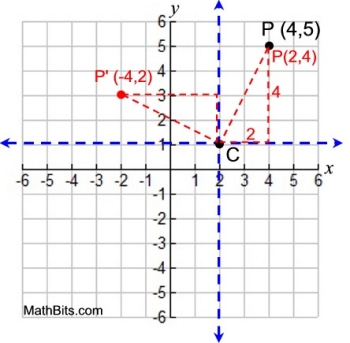
• Since C is our new origin, our mapping rules for rotations now apply (in relation to C).
• Rotate point P 90º about point C.
Use the rule (x,y) maps to (-y,x).
P' (-4,2)

• DO NOT use the numbers on the
original x and y axes to plot P'(-4,2).
You must plot in the "new world" of point C: from C move 4 units left and 2 units up. |
 |
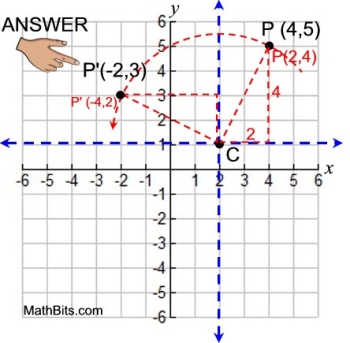
• It is now time to leave the "new world" of point C and return to the original x and y axes and the original origin.
• Read the location of P' from the original graph as (-2,3)
•
The answer to this rotation about point C
is P'(-2,3).
Notice how the hypotenuses, which are of equal lengths in the two congruent triangles, represent radii of the circular arc through the point and its rotation.
In a rotation, the point and its rotation are the same distance from the center of rotation. |
 |
The problem with Method 2 is trying to remember all of the steps that need to be done.
Let's make a list of what needs to be accomplished.
1. Draw a new set of axes at the new center of rotation.
2. Rename the vertices (points) in relation to the new center of rotation axes.
3. Apply the rotation "rules" to the vertices (points) on the new axes.
4. Rename the new vertices (points) to correspond to the original axes.

Method 3 is another way to look at the concepts presented in Methods 1 and 2.
Instead of drawing a new axes and renaming points, Method 3 will "count".
( Method 3 as similar to looking at "slopes" of lines.)
 |
 |
Method 3 will also use these basic mapping rules through the origin for rotations of 90º, 180º, and 270º CCW. |
| Rotating the point P(4,5) 90º CCW About the Center Point C(2,1): |
Method 3 - Count the Distances and apply the Rules
Method 3 is not as messy!
• Plot the point P and the center C.
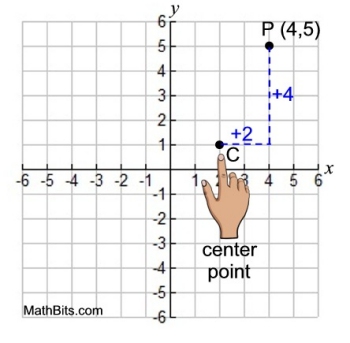
• Now, starting at the center C, "count" the number of units to the right and the number of units up to reach point P.
• The x-distance was 2 units to the right.
The y-distance was 4 units up.
(2,4)
• Apply the rule for 90º rotation CCW to
the counted distances.
(2,4) → (-4,2)
|
 |
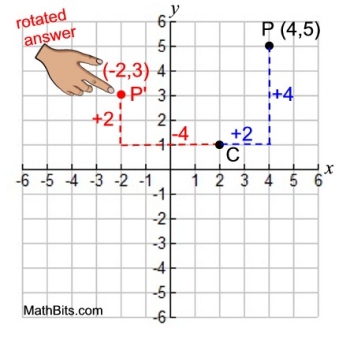
• Now, from the center C, "count" the distances in the x and y directions indicated by
(-4,2).
• Move 4 units to the left and 2 units up.
• You have arrived at your answer!
The point is P'(-2,3). |
 |


NOTE: The re-posting of materials (in part or whole) from this site to the Internet
is copyright violation
and is not considered "fair use" for educators. Please read the "Terms of Use". |
|
